Thursday 26 July 2012

Getting stronger...

Just a brief update for you all regarding the progress of what I have growing in the garden...


First of all, a lot of action with the runner beans...! I counted the other day and I have over 50 formed bean pods from four plants, so it won't be long now before I have to think of 101 different ways to use them!


The radishes, that had taken a pounding the other week from Mr Snail, have now grown their second set of leaves, and even the ones that were mostly eaten have staged a mini-revival of sorts.


Some very promising beetroot seedlings too - the leaf count appears to have doubled in the last week. Not too sure when the best time is to plant these out...? Any collective wisdom greatly appreciated.


The fennel is starting to produce it's second set of leaves, which are those feathery tendrils - good to see! Again - not too sure when it is best to plant these out, but they seem too weak at the moment, so I'll leave them until they are a lot stronger and more established.

And finally, back to the beans!:


A grower's dream... pods in abundance!

Wednesday 25 July 2012

Sweet onion relish

In the last week or so with the good weather, we have been having a fair number of barbecues. I'd already concocted this sweet relish as a filling for a chicken pitta, but it works equally well in other bread-meat combinations such as hotdogs and hamburgers.


I haven't grown onions or peppers this year, but I would certainly make use of them in this way... with my usually small yields it's good to have some recipes for things which don't need much content!


Ingredients:

1 large onion
1/2 red pepper (or whole ramiro pepper)
2 tbsp caster sugar
1 tsp olive oil
1 tsp smoked paprika
1/2 tsp ground nutmeg
2 tbsp tomato ketchup
1 tsp honey (optional, to taste)


First of all, cut the onion in half and then slice into half centimetre widths. Add it to a saucepan with the sugar and oil. Give the onions a quick stir to coat them in the sugar and oil, and then heat gently so that they soften.

Tip here (as seen recently on an episode of River Cottage) - for a better flavour don't stir the onions too much; just let them simmer away... apparently if you move them around a lot they shed their water content, plus leaving them to sit gives them those nice brown edges.


After a few minutes, add the paprika and nutmeg, and (very gently!) stir in. The next time you go to turn the onions, add one of the tablespoons of ketchup at the same time.


Once the onions are soft, slice up your half red pepper and add it to the pan (you can use a ramiro pepper - you will need a whole ramiro though as it tends to be less bulky than a bell pepper). Again, keep turning the mixture sparingly, until the pepper is softening too.

Then add the rest of the ketchup, and again move the contents of the pan around every so often, so that the onions and peppers char a little.


Almost done - however, get a bit of onion and pepper on a spoon and taste the relish. I like mine quite tangy and sweet - if the flavour isn't quite there for you, I've found adding a teaspoon of honey gives it that extra body and rounded flavour. Remember - it's an accompaniment to other food, so it's OK if it is a little too sweet on its own.

You're then good to go - serve it up as a filling for a pitta or burger, or even have it as a condiment... I suspect it would work well as part of a ploughmans type meal, although I haven't tried that yet...!


Monday 23 July 2012

Fantastic Mr Fox?

6am Saturday morning, I was up, and having let the chickens out of their house and into their run I was settling down to my morning routine.

About half an hour later I could hear a little noise from the chickens, but this is not uncommon when they are laying. Em however, who is far more observant when it comes to the various noises they make, was stirred from sleep upstairs... the next thing I knew, Em shouted 'MATT! FOX! IT'S A FOX! GET OUT THERE!'.

Benny chicken - one of our three hens
I remember when we first got our chickens over a year ago, we were super aware of the threat posed by foxes; but as the year has passed, we had not seen any nearby and believed that because we live in the middle of an island of houses whose gardens back onto each other, that a fox would not be able to reach our chooks... we know better now.

After Em's alarm-raising shouts, the fox cleared three low fences along our row of houses and disappeared. I didn't see it myself, but Em said it was a big one - it looked as though it had already caught something and was making off with it... thankfully all our chickens were left slightly startled, but unharmed.

So - a plan of action was required! We decided that we would move the chickens from the back of the garden (which is more overgrown) to much closer to the house. Our garden is about 60ft long, so they weren't that far away - but our hope is that foxes will be far more reluctant to come right up close to our house.


We have a really decent chicken house with built in run that we got from Flyte So Fancy, who also supply the egg boxes that we use to sell the chicken's eggs outside our house 50p for a box of four (shameless plug I know, but it's a great price!). However, wherever you place the house and run, the chickens scratch and tear the floor to pieces - a lush section of grass is reduced to bare earth in around a week.

Moreso, once the chooks have scratched down to the bare earth, they then start digging to the sides of the run, effectively scratching away at their own foundations... another side effect is that holes start appearing through which either chickens could escape or predators could get in.

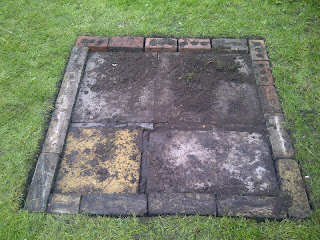
The 'concrete bowl', dug and laid into the lawn
So my fairly foolproof method to prevent this is to create a 'concrete bowl', using paving slabs and bricks to create an impregnable base which is impossible for them to scratch through downwards or sideways - we then cover the concrete base with wood chippings, in part to soak up the mess, and also to give them something to scratch around on.

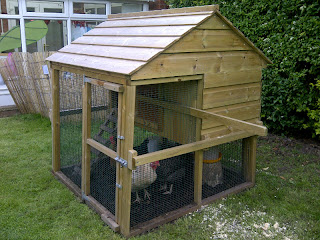
The hen house and run, re-sited on top of the foundation
So after a couple of hours of digging, lugging bricks and paving stones, a vertical hen house lift over a short fence involving four family members, and the attachment of various extra locking safeguards against lupine visitors, the chickens now seem content in their new position.

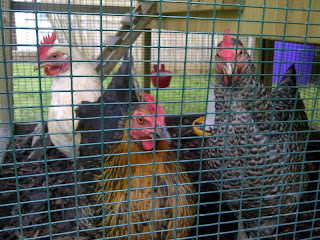
Jerry, Frankie and Benny (l-r) safe and happy
We have not seen anything of Mr Fox since - long may that continue...

Thursday 19 July 2012

Seedlings progress

Just a brief update on the current goings on...

I went over to the plot yesterday evening and it's not good I'm afraid. The only things that are really growing are various types of weed; I've identified one carrot seedling, a few measly rocket stems and the very last beetroot seedling which survived a partial devouring, but hasn't done much since.

Still, ever the optimist, I thought I would show you how the seedlings back home are doing, which will replace what I've have sown currently at the plot...


The radishes, having survived the advances of Mr Snail are doing really well now, with the second set of leaves starting to develop.


This is the first time I've see what fennel shoots look like(!), as the packet didn't have a picture (as is usually customary for Johnsons seeds). I've since had a few more poke up through the soil after some recent doses of nettle water.


In fact, all the seedlings have benefitted from the nettle water, which is providing some much needed sustenance - I'm waiting for these cabbage seedlings to harden up a little and develop into the next phase of growth.


The beetroot seedlings are coming on too - these are already looking much healthier than the single half-eaten one I have at the plot.


And finally, a nice angular shot of the runner beans, which are on the home straight now... last time I grew them the flowers were quite sparse - but not so this year... I have five or six clusters of flowers that are developing pods. Looks like I will have to work on a variety of recipes in which to use them, as they are looking like my only bumper crop this season.

Tuesday 17 July 2012

Got him!

Breaking news: In a sortie last night under cover of darkness (with an electric torch!), I found my rogue gastropod!


He was already making his way from the bottom of the greenhouse when I caught him in the act!

In retrospect, I had made quite a snail/slug haven at the base of the greenhouse - because it is one of those tall thin mini-greenhouses, I had put loads of bricks on the bottom shelf to weigh it down so it didn't get blown over. With all the damp, plus the bricks as cover from predators, it was probably the perfect place to hide out.

So I've reorganised now - tidied up and used a lot less bricks, and I'll know to regularly check there now to make sure I'm not harbouring any unwanted stowaways.

It feels a sense of achievement in catching the snail - let's just hope I'm not like that deluded bunch of fishermen in Jaws where they think they've caught the right shark, only later to proved very, very wrong(!). Signs are good so far though... no more munched leaves this morning.


And as for Mr Snail himself, I have to confess I relented on my sentence pronounced yesterday - as the chickens were tucked away and asleep, I decided to extend mercy and threw the snail alive right up the back of the garden. It's fate may still be sealed though, running the gauntlet with the many hedgehogs we have milling around, as well as a resident song thrush, which we've witnessed killing many a snail, breaking the shells on our garden path.

Monday 16 July 2012

Collateral damage

Not good news I'm afraid - despite my radish, beets and cabbages all starting to spring up in the greenhouse, I've had a visit two nights in a row from a rogue gastropod. The radishes are being systematically picked off... 


So frustrating - what's more, is I've turned the drill upside down, around, had a good inspection of the greenhouse and cannot spot the slug/snail anywhere - as soon as I do though, there's not going to be any mercy - it's going straight to one of the chickens. 

I've not really had a problem with them before in the greenhouse, but I guess with the wet weather, they are finding it easier to make the climb up the sides to where the seedlings are. It's a battle of wills, and I may pop out last thing tonight with a torch to see if I can catch him in the act...

And now, a few oddities that have arisen in the back garden - a freak show, for your viewing pleasure, if you will...:


My dwarf beans - a couple of plants that I was growing (but failed to train up canes through moderate ineptitude) have developed curled bean pods. They look like those dangly earrings from the 80's! Can't think why they have done this... perhaps keeping their feet out of the mud and mire below...?


I have a couple of mushrooms growing in my old pea plant pot - I'm not going to eat them, but would be interested to know the classification if anyone has any ideas? I guess with the wet humid weather, mushroom foragers across the land are in for some rich pickings.


This mottling has happened each year I have grown broad beans - I don't know whether it is just age, disease or both; or whether they are ant bites, as I seem to have a lot of them around the plants, and they are often climbing up and down them.


Despite the wear and tear, I did manage to pick a respectable handful of the pods from the plants. Remarkably unmarked in comparison to the plants...


 I think I probably picked the pods a little early - the beans were a fair size, but they could probably have waited another week or so to plump up... well, you live and learn.


Still, I made some chicken pittas last night with a vegetable salsa-type filling - to finish them off I fried the broad beans and sprinkled them inside. Rewarding to eat your own produce, however small a contribution it makes to your plate. I'm afraid I don't have a picture of the pittas, because we ate them too fast!

Friday 13 July 2012

Runner or couch potato?

Whilst I am waiting for progress with the new seedlings, I currently have a few other veggies on the go in the back garden... runner beans and potatoes. I have found them both easy to grow and within the next few weeks will surely give me a modest bounty for my efforts, despite the current weather...

The runner bean plants a few weeks ago
I have four runner bean plants (Scarlet Emperor) in a long trough that sits on the garden path. It amazes me every time with any bean plants the tender seedlings punch through the soil and within weeks they are snaking their way up the canes.


The runners are at the flowering stage at the moment - the first flower ably indicated above by Em's finger (her nail polish is a pretty close match too!).

Lots of potential here...!
They have since been popping out all over the place, and pretty soon if I want to see the flowers start growing into the beans, I may need to pinch the top of the plants off once they reach the top of the canes.


I also have two sets of potatoes in grow bags. This is the first time that I have done them, and I have two varieties (neither of which I can remember the name of at the moment!). The bags were fairly cheap, and I just planted five seed potatoes in each... probably a little bit of overkill there, but you're never quite sure how many you should do when you first start!

I like the fact that you can positively mistreat potatoes shoots as they grow by earthing them up and covering them over with soil, and they will still push through. They are very forgiving to the amateur grower. All you have to do is remember to water them regularly, but as we all know, water hasn't been in short supply this season!


Recently the plants have started to flower, and I'm told that once they have done so and the leaves start to wilt, it's time to go digging for the treasure that may lie beneath!

Furthermore, since starting to put this post together, I am already seeing encouraging signs from the radish drills I sowed the other day... it's a joy to actually see something growing!


Wednesday 11 July 2012

Overcoming the gastrop-odds

I'm a bit miffed if I'm honest.

I've visited the plot a few times recently, and whatever encouraging growth there was the previous time I visited has been stripped bare by slugs, snails and whatever else - despite best attempts to halt their progress with garlic water, slug traps and so on, the tender veg shoots are just getting devoured...
(From  http://en.wikipedia.org/wiki/Slug
...and the rain just keeps coming and coming - my well tilled earth is becoming like a quagmire, and I'm feeling desperately concerned for anything in the ground that the seed packets advise shouldn't be overwatered.

Still, I'm not the sort of person to give up lightly, and to be honest if you are a gardener in the U.K. it is probably par for the course (can I hear an 'Amen'?). If you can't weather the downs you have no right to enjoy the ups... and I guess it makes it all the more rewarding in the end.

In fact, I'm feeling positively Churchillian about it - 'We'll fight them on the raised beds, we'll fight them in the greenhouses'... basically, they aren't going to win... even if I have to set up an entire moat of real ale around my plot and patrol by night with a headlamp and speargun!


So, I've got back to my mini greenhouse and sowed some more drills and pots with the veg seeds I have already sown a few weeks ago in the ground. I figure that if I can get some decent seedlings going and get them past the tender stage, they will stand a much better chance of dodging becoming breakfast or supper for the passing gastropods...


As well as the fennel, radish and beetroot, I have sown some spring onions (White Lisbon) and cabbage (Hispi F1). I will also be doing some kale, and perhaps also some broccoli or cauliflower thanks to some encouragement from Sue@G.L. Allotments the other day.

Saturday 7 July 2012

Rhubarb jam

We have a rhubarb patch in our garden - I would say there are about three or four crowns packed together in the one spot, and every year we have been here it has produced a good 2 - 3 kilos of tangy goodness!


I made a kilo and a half of rhubarb jam earlier in the year amongst other things which was delicious, and I thought that perhaps that I had harvested my lot... but it would seem that with all the wet weather the crowns have undergone a renaissance, and I was able to pick a further kilo the other day with only one thing on my mind... more jam!

So, here we go - how to make rhubarb jam. First of all you will need:

1kg of rhubarb
1kg jam sugar (containing pectin)
1 lemon (although both times I have used an orange)

Firstly, I cut the rhubarb into chunks add them to a large pan with the juice from the orange and soften them over a medium heat.


As the edges of the rhubarb chunks start breaking up, I add the sugar.


At this point, you wonder how on earth you will get rid of all the sugar, but after a bit of a stir it melts into a syrup.


This is the key part - get the fruity syrup in the pan up to a running boil and time 4 minutes.


After the four minutes are up, turn off the heat, grab a spoon (not your finger!) and get a blob of the syrup and put it on a cold plate... after 30 seconds or so, if you push your finger through the syrupy blob, it should wrinkle, meaning that it will set (if that doesn't work, boil the syrup for a few more minutes).


If you have a lot of bubbles formed on the top, after a few minutes you can whisk that layer off the top with a slice - however, in order to keep more of the jam I decided to quickly stir them in whilst the syrup was still molten (jam perfectionists will shudder as they read this).


Then decant into sterile recepticles (preferably jars - as you can see, I didn't have any), et voila! Let it cool down and set, and then you're ready to go!


Thursday 5 July 2012

A new project - part 2

So, here's the plan for the first plot...


The plot a few days ago...
I'm still a novice when it comes to gardening, but I understand a little about crop rotation. You wouldn't usually do that within a single bed, but with a busy life, you never know how much time you will actually have until you get going...

I'd like to think I could do three or four plots, but even just the one is taking some time... so I've decided to try a bit of everything rather than do a whole bed of just a few vegetables.

I gather the three main groups of veg are brassicas, root veg and legumes/onions/salad, and so I have divided the plot up like so:


I have then opted for the following arrangement:


As I've mentioned before, I've never done peas to any great volume, so I've given a generous slice of the legume section over to those (Kelvedon Wonder). I am then finishing off with a small patch of rocket (wild), and then onions (Ailsa Craig) and probably spring onions... I've put the onions in the middle as they're supposed to be a deterrent to some pests.

On the root veg side, I'm going for beetroot (Boltardy), two types of carrot (long (Autumn King 2) and short (Atlas) varieties), fennel (Florence Chiarino) and radish (French Breakfast 3).

I've put the rocket and radish up in the middle of the plot, because there are a few trees nearby that will provide some shade during the hottest part of the day. Once the peas and fennel have grown a bit, that should also add to the shade in the middle there.

Finally, for the brassica section I'm a little undecided - this will be the first time I've tried them and to be honest I'm not sure what will work, especially seen as I'm halfway through the season... I am considering cabbage and perhaps kale...? If anyone has any suggestions from their own experience please do let me know.

I've then finished off the brassica section by sneaking in a small section of dwarf beans (Tendergreen) - which aren't brassicas I know, but I ran out of room elsewhere and as they tend to be quite tall, it makes sense to have them at the back.


Master of all he surveys...?!
At the moment the peas, beans, rocket, beetroot, fennel, onion, one sowing of radish and both carrots are in (the netted areas)... just waiting to finish the rest of the plot off... then let the battle of wills begin with the wildlife!